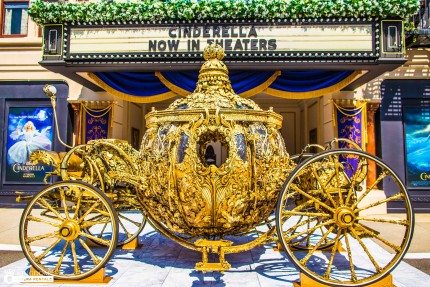
This week I’ll share some of my favorite Lightroom editing tools that will help you add impact and punch to your photos!
I recommend that you find a Lightroom tutorial to learn how to fully use Lightroom. I purchased Lightroom QuickStart Tutorial for Mac, which is available by download in the App Store for $4.99. I also subscribe to Scott Kelby’s online instructional videos – KelbyOne.com which I highly recommend.
My original image is a RAW file – meaning it is not processed in the camera like a JPEG image is. It’s like unprocessed film. The image must be processed in a photo-editing program such as Lightroom or Photoshop.
After importing the image to Lightroom, I start by cropping it and adjusting the horizontal tilt to align the photo properly.
Now, the fun begins! There’s a couple of editing tools I really love to use, in  the section titled “Presence”. These three tools make things come alive in a photo! They are super easy to use – just drag the sliders left and right, and notice how your image changes!
- Clarity
- Vibrance
- Saturation
CLARITY. The clarity tool makes details pop out of the image. I love this tool for just about everything Adding clarity to night shots, fireworks, ride and landscape shots will sharpen the detail in the midtones. Clarity is a tool that will add impact and punch to your photos!
However, increasing clarity will add unflattering lines to portraits, but you can use negative clarity to soften skin texture. The technique requires a bit of explanation so we’ll save it for another time.
Details pop out in the carriage after 100% Clarity was applied. Better.

VIBRANCE. The vibrance tool adds more color to the less saturated colors, and does not affect skin tones. With vibrance only the least saturated colors in the image are adjusted and those pixels, which are already relatively saturated, are adjusted less. The result is that you’ll get a general improvement in the saturation in colors in the image.
The carriage color comes alive by adding 62% vibrance! Getting there.

SATURATION. The saturation slider can deepen and brighten colors or remove the depth and color in the photo. While vibrance affected the muted colors in the photo, saturation affects all the colors – including skin tones. Add too much saturation to photos with people and you’ll have them looking like they have a bad, orange glow, self tan!
It’s looking much better with 59% Saturation added!

The Presence sliders tend to darken the photo, so I usually increase the exposure a little to compensate for it. For this photo, I lightened up the shadows, and increased luminance to the yellow and green…and there you have it!
What a difference, right?!!! In just a couple of minutes, I processed this photo from a carriage that looks like it needs a good polishing, to a bright, shiny, gold carriage fit for a princess!

If you shoot in JPEG, the camera will process the image. You can still make some adjustments in Lightroom, but you won’t be able to change as many things as you can with a RAW file.
Give it a try and share your before and after photos with us! If you have any tips or questions, we’d love to hear them. We’re here to help you!
Have Fun in Focus!
Lenise
 Lenise and her husband Ron own and run Kingdom Camera Rentals. If you are in or coming to the Disney and interested in renting a camera from them, you can reach them at:
https://www.kingdomcamerarentals.com/
[email protected]
855.KCR.8555

- How to Experience Grinchmas in Seuss Landing - December 17, 2024
- Pirate’s Rockin’ Parlay Party from the Disney Treasure - December 16, 2024
- SeaWorld Orlando Invites Guests the 2025 NYE Celebration - December 16, 2024


